Hello Friend,
If you are writing posts for your blog or your websites then you must have to need tagged system in you website. If you write post for technology then you create tags something like that technology name, technology types, technology features etc. So if you want to add tags in your posts or blog then you can use this tag systems.
In this post,I will show you how to generate tags system in laravel application using rtconner/laravel-tagging composer package. Here I will create posts table and then install laravel-tagging package. So When you create new posts or blog then you can add tags that you want on each posts or blog.
I am use bootstrap tagsinput js library for input tags that way it’s awesome layout for inputs tags .
Here I will give you full example for laravel tags system tutorial example. So Let’s follow bellow step by step.
Step 1 : Install Laravel Fresh App
In first step, You have to need laravel project. You can install laravel fresh project using bellow composer command:
composer create-project --prefer-dist laravel/laravel blog
Step 2 : Setup Database Configuration
After successfully install laravel app thenafter configure databse setup. We will open “.env” file and change the database name, username and password in the env file.
DB_CONNECTION=mysql
DB_HOST=127.0.0.1DB_PORT=3306DB_DATABASE=Enter_Your_Database_NameDB_USERNAME=Enter_Your_Database_UsernameDB_PASSWORD=Enter_Your_Database_Password
Step 3 : Install rtconner/laravel-tagging Composer Package
In this step, we require to install “rtconner/laravel-tagging” composer package for add tags. so let’s run bellow command:
composer require composer require rtconner/laravel-tagging
After successfully install package, open config/app.php file and add service provider.
config/app.php
'providers'=>[.... ConnerTaggingProvidersTaggingServiceProvider::class,]......
After register provider, we require to make public configuration and then run migration for tags tags, so let’s run bellow both command.
php artisan vendor:publish --provider="ConnerTaggingProvidersTaggingServiceProvider"
For run migration:
php artisan migrate
Step 4 : Create posts table and model
In this step, You have to create posts table in your database. Run bellow command to create migration and modal So lets open terminal and run bellow command:
php artisan make:modal Post-m
After run above command, you will see a migration file in following path database/migrations and you have to simply put following code in migration file to create posts table.
<?php
useIlluminateDatabaseMigrationsMigration;useIlluminateDatabaseSchemaBlueprint;useIlluminateSupportFacadesSchema;classCreatePostsTableextendsMigration{/**
     * Run the migrations.
     *
     * @return void
     */publicfunction up(){Schema::create('posts',function(Blueprint $table){            $table->id();            $table->string('title');            $table->longText('description');            $table->text('tags');            $table->timestamps();});}/**
     * Reverse the migrations.
     *
     * @return void
     */publicfunction down(){Schema::dropIfExists('posts');}}
Run migration file and run following command:
php artisan migrate
After create ‘posts’ table thenafter changes in Post modal copy bellow code and put in the Post.php file.
app/Post.php
<?php
namespaceApp;useIlluminateDatabaseEloquentModel;useAppUser;classPostextendsModel{use ConnerTaggingTaggable;protected $fillable =['title','tags','description'];}
Step 5 : Add Route
Here We will create route for posts listing and create post. So let’s open routes/web.php file and add following routes:
routes/web.php
Route::get('posts','PostController@create');Route::post('posts','PostController@store');
Step 6 : Create Controller
In this step, You can create Post Controller and add two method in post controller first method is create form and second method is store data:
app/Http/Controllers/PostController.php
<?php
namespaceAppHttpControllers;useIlluminateHttpRequest;useAppPost;classPostControllerextendsController{publicfunction create(){        $posts =Post::all();return view('posts',compact('posts'));}publicfunction store(Request $request){        $this->validate($request,['title'=>'required','description'=>'required','tags'=>'required',]);        $input = $request->all();        $tags = explode(", ", $input['tags']);        $post =Post::create($input);        $post->tag($tags);return back()->with('success','Post created successfully.');}}
Step 7 : Create View File
In Last step, let’s create posts.blade.php(resources/views/posts.blade.php) for layout and we will display all posts and create posts form,so put following code:
resources/views/posts.blade.php
<htmllang="en"><head><title>Laravel Tag System Tutorial Example</title><linkrel="stylesheet"href="https://cdnjs.cloudflare.com/ajax/libs/twitter-bootstrap/4.5.0/css/bootstrap.min.css"integrity="sha256-aAr2Zpq8MZ+YA/D6JtRD3xtrwpEz2IqOS+pWD/7XKIw="crossorigin="anonymous"/><linkrel="stylesheet"href="https://cdnjs.cloudflare.com/ajax/libs/bootstrap-tagsinput/0.8.0/bootstrap-tagsinput.css"integrity="sha512-xmGTNt20S0t62wHLmQec2DauG9T+owP9e6VU8GigI0anN7OXLip9i7IwEhelasml2osdxX71XcYm6BQunTQeQg=="crossorigin="anonymous"/><scriptsrc="http://ajax.googleapis.com/ajax/libs/jquery/1.9.1/jquery.js"></script><scriptsrc="https://cdnjs.cloudflare.com/ajax/libs/twitter-bootstrap/4.5.0/js/bootstrap.min.js"integrity="sha256-OFRAJNoaD8L3Br5lglV7VyLRf0itmoBzWUoM+Sji4/8="crossorigin="anonymous"></script><scriptsrc="https://cdnjs.cloudflare.com/ajax/libs/bootstrap-tagsinput/0.8.0/bootstrap-tagsinput.js"integrity="sha512-VvWznBcyBJK71YKEKDMpZ0pCVxjNuKwApp4zLF3ul+CiflQi6aIJR+aZCP/qWsoFBA28avL5T5HA+RE+zrGQYg=="crossorigin="anonymous"></script><scriptsrc="https://cdnjs.cloudflare.com/ajax/libs/bootstrap-tagsinput/0.8.0/bootstrap-tagsinput-angular.min.js"integrity="sha512-KT0oYlhnDf0XQfjuCS/QIw4sjTHdkefv8rOJY5HHdNEZ6AmOh1DW/ZdSqpipe+2AEXym5D0khNu95Mtmw9VNKg=="crossorigin="anonymous"></script><styletype="text/css">.label-info{ background-color:#17a2b8;}.label { display:inline-block; padding:.25em.4em; font-size:75%; font-weight:700; line-height:1; text-align: center; white-space: nowrap; vertical-align: baseline; border-radius:.25rem; transition: color .15s ease-in-out,background-color .15s ease-in-out, border-color .15s ease-in-out,box-shadow .15s ease-in-out;}</style></head><body><divclass="row mt-5 mb-5 mr-0"><divclass="col-md-10 offset-1"><divclass="card"><divclass="card-header bg-info text-white"><h4>Laravel Tag System Tutorial Example - Nicesnippets.com</h4></div><divclass="card-body"> @if(Session::has('success'))
<divclass="alert alert-success"> {{ Session::get('success') }}
@php
Session::forget('success');
@endphp
</div> @endif
<formmethod="POST"action="{{ route('posts.store') }}"> @csrf
<divclass="form-group"><label>Title : <spanclass="text-danger">*</span></label><inputtype="text"name="title"class="form-control"> @if ($errors->has('title'))
<spanclass="text-danger">{{ $errors->first('title') }}</span> @endif
</div><divclass="form-group"><label>Description : <spanclass="text-danger">*</span></label><textareaclass="form-control"name="description"></textarea> @if ($errors->has('description'))
<spanclass="text-danger">{{ $errors->first('description') }}</span> @endif
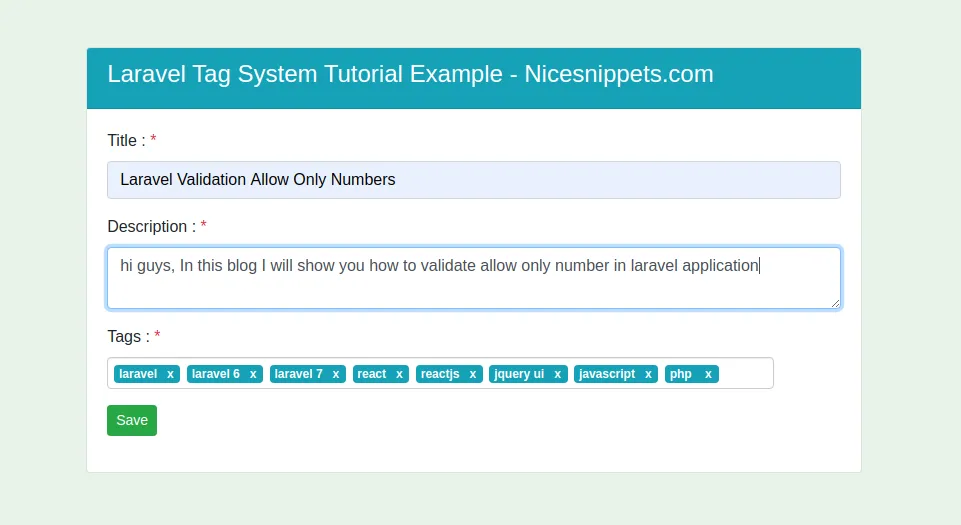
</div><divclass="form-group"><label>Tags : <spanclass="text-danger">*</span></label><br><inputtype="text"data-role="tagsinput"name="tags"class="form-control tags"><br> @if ($errors->has('tags'))
<spanclass="text-danger">{{ $errors->first('tags') }}</span> @endif
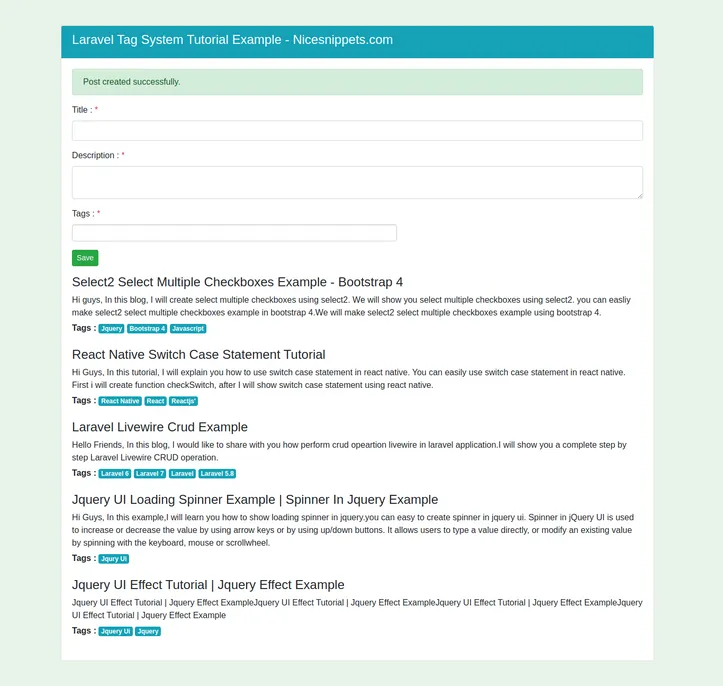
</div><divclass="form-group"><buttonclass="btn btn-success store-data btn-sm">Save</button></div></form> @if($posts->count())
@foreach($posts as $post)
<divclass="post-section"><divclass="post-title"><h4>{{ $post->title }}</h4></div><divclass="post-description"><pstyle="margin-bottom:5px!important;">{{ $post->description }}</p></div><divclass="post-tags mb-4"><strong>Tags : </strong> @foreach($post->tags as $tag)
<spanclass="badge badge-info">{{$tag->name}}</span> @endforeach
</div></div> @endforeach
@endif
</div></div></div></div></body></html>
Now we are ready to run our example so run bellow command for quick run:
php artisan serve
Now you can open bellow URL on your browser:
http://localhost:8000/posts
you can get more information about “rtconner/laravel-tagging” package from here :
Output :
It will help you…